# Welcome to the GreenHell Modding docs!

GreenHellModding aims to extend the survival game Green Hell by adding mods. This site provides a clean overview over everything related to modding Green Hell.

![](https://1233583207-files.gitbook.io/~/files/v0/b/gitbook-legacy-files/o/assets%2F-M5KKfkIqMO_EFPortVm%2F-M5KL2m0_tsiGaWV8orQ%2F-M5KLtp9Qahv2HhSiex-%2Fghm_logo.png?alt=media\&token=d67206f6-6781-44c5-9bea-6b67d40dc8aa)


# How to install GreenHellModLoader

This Tutorial aims to show you how to install GreenHellModLoader.

Let's get started with the first step!

### 1. Downloading the Launcher

First, download the latest version of our launcher [here](https://www.raftmodding.com/download). Then place it where ever you want, but we recommend you keep it on your desktop, or somewhere easy to use.

<div align="center"><img src="https://1233583207-files.gitbook.io/~/files/v0/b/gitbook-legacy-files/o/assets%2F-M5KKfkIqMO_EFPortVm%2F-M5ZkB64dTboxogr6Vne%2F-M5ZlUh7B6o1aRGCtBMa%2Fimage.png?alt=media&amp;token=5d862d83-e2ac-41b9-a4ca-159177aa2aef" alt="Click the green button to download the latest version of the launcher from our website"></div>

### 2. Terms of Service

Start the launcher by opening the file you downloaded. On first launch you will be prompted to accept our Terms of Service, which is necessary for using our software. By pressing "Agree", you confirm that you accept them. If you have any questions regarding you data privacy, please feel free to contact us via [Discord](https://www.greenhellmodding.com/discord) or via [E-Mail](https://www.greenhellmodding.com/contact).

<div align="center"><img src="https://1233583207-files.gitbook.io/~/files/v0/b/gitbook-legacy-files/o/assets%2F-M5KKfkIqMO_EFPortVm%2F-M5ZkB64dTboxogr6Vne%2F-M5ZoHWBufxLVkOQJDfv%2Fimage.png?alt=media&amp;token=b20976dc-f1c5-4f62-8314-a3daddcfe965" alt="Click on the green button if you accept our Terms of Service"></div>

### 3. Installation

After accepting the terms of service the launcher will download and install all the required files as shown below. You don't need to do anything here, just wait. It can be pretty fast as its less than 5 MB.

![Click on the Downloads section to see the progress of the downloads ](https://1233583207-files.gitbook.io/~/files/v0/b/gitbook-legacy-files/o/assets%2F-M5KKfkIqMO_EFPortVm%2F-M5ZkB64dTboxogr6Vne%2F-M5Zp2Ahe4BHUguxRCMi%2FCapture.PNG?alt=media\&token=3b93a791-c9af-41f2-9725-526aeae55bef)

### 4. Launching modded Green Hell

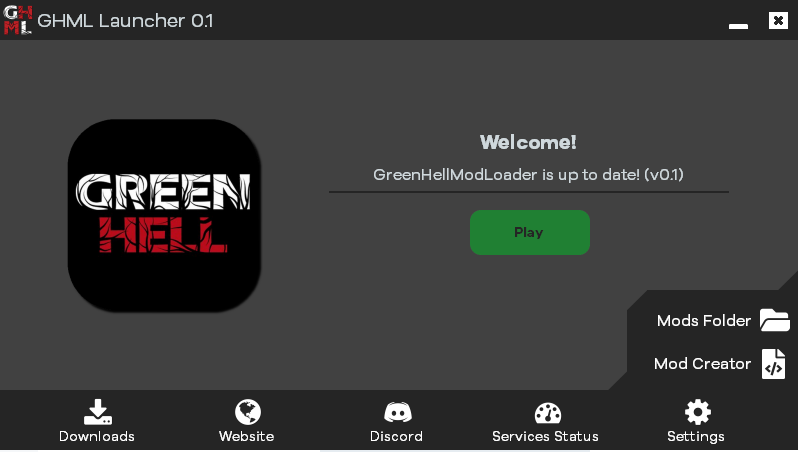
And finally, once the launcher has downloaded and installed all required files, a **`Play`** button will appear as shown below. To start the mod loader, press the **`Play`** button and the game will start. Each time you want to play with mods you have to start the launcher and click on **`Play`**

### 5. Inside the game

Then once the game has loaded you should have a new menu in the Green Hell main menu as shown below. If the new menu does not show up in-game, take a look at our troubleshooting guide:

{% content-ref url="/pages/-M5Zpm9EWTlxTjzotG3z" %}
[Troubleshooting](/tutorials/how-to-install-greenhellmodloader/troubleshooting)
{% endcontent-ref %}

![](https://1233583207-files.gitbook.io/~/files/v0/b/gitbook-legacy-files/o/assets%2F-M5KKfkIqMO_EFPortVm%2F-M5Zpx4sEIBGsmUswnFd%2F-M5ZsA2GntVsUxV8xDOp%2Fimage.png?alt=media\&token=9c56696d-7e49-4196-864a-a62cd857cd54)


# Troubleshooting

When the software doesn't do what it should...

If installing the mod loader is not working as expected, don't worry. Please take a look at the following document which describes some of the more common issues with installing the mod loader. If none of this works, please join our [Discord server](https://raftmodding.com/discord) or contact us via [E-Mail](https://raftmodding.com/contact) and we will be happy to help you!

## What's wrong?

First of all, we need to find out what's the problem. Which of the following descriptions describes your problem best? If an error popped up, try to find the headline with the text describing the error.

* [The menu inside the game does not show up](https://api.raftmodding.com/tutorials/how-to-install-raftmodloader/troubleshooting#menu-not-showing-up)
* [Other / My problem could not be solved with this guide](https://api.raftmodding.com/tutorials/how-to-install-raftmodloader/troubleshooting#other)

## 'The menu inside the game does not show up' <a href="#menu-not-showing-up" id="menu-not-showing-up"></a>

This is a fairly common issue so don't worry. Please do the following steps:

#### 1. Open the launcher

Close Green Hell if it is still running and open the launcher application.

<div align="center"><img src="https://1233583207-files.gitbook.io/~/files/v0/b/gitbook-legacy-files/o/assets%2F-M5KKfkIqMO_EFPortVm%2F-M5Zpx4sEIBGsmUswnFd%2F-M5Zqezb0zgMash9rVE9%2Fimage.png?alt=media&amp;token=0e378651-ad95-4dcf-ad70-c2be85f426e7" alt=""></div>

#### 2. Open the settings

Click on Settings:gear:icon to open the Launcher settings.

![](https://1233583207-files.gitbook.io/~/files/v0/b/gitbook-legacy-files/o/assets%2F-M5KKfkIqMO_EFPortVm%2F-M5Zpx4sEIBGsmUswnFd%2F-M5ZrOmafjU3dyYstSrZ%2FCapture.PNG?alt=media\&token=51554430-7b16-4411-9332-a905e6034662)

#### 3. Change the starting method

In the settings, there is an option for changing the starting method. You can choose betweeen `Steam`, `Executable` and `Force Start`. If you have never changed this before, the current value should be `Steam`. **Please select `Force Start`.**

![](https://1233583207-files.gitbook.io/~/files/v0/b/gitbook-legacy-files/o/assets%2F-M5KKfkIqMO_EFPortVm%2F-M5Zpx4sEIBGsmUswnFd%2F-M5ZrD3qE8UBDhxQrj4p%2FCapture.PNG?alt=media\&token=33e9b644-32c9-4213-8953-eb926a917e41)

#### **4. Start the game**

Now, close the Settings by clicking the gear :gear: again and press `Play` to start the game.

#### 5. Did it work?

If this worked, you should now see the modding menu inside the game. If you can not see the menu as shown below, please go back to step 3 and try to change the Starting Method to `Executable`.

![](https://1233583207-files.gitbook.io/~/files/v0/b/gitbook-legacy-files/o/assets%2F-M5KKfkIqMO_EFPortVm%2F-M5Zpx4sEIBGsmUswnFd%2F-M5Zs58a8W2x_j_1qJD1%2Fimage.png?alt=media\&token=dec27cc1-6026-4180-a65c-cad3685c5c9a)

{% hint style="info" %}
If you can't solve this problem with this guide, make sure to contact us and we'll be happy to help you.
{% endhint %}

## Other / My problem could not be solved with this guide <a href="#other" id="other"></a>

It seems like your problem is a bit uncommon. But don't worry, we'll be happy to provide personal support on our [Discord server](https://raftmodding.com/discord) or via [E-Mail](https://www.greenhellmodding.com/contact).


# How to install a mod

This Tutorial aims to show you how to install a mod on Green Hell using GreenHellModLoader!

Let's get started with the first step!

### 1. Installing the mod loader

If you haven't done it already, install GreenHellModloader. Please review our guide on that topic for in-detail explanations.

{% content-ref url="/pages/-M5ZkIGCCRIsnL9l0NPQ" %}
[How to install GreenHellModLoader](/tutorials/how-to-install-greenhellmodloader)
{% endcontent-ref %}

### 2. Finding mods

To search and find mods of your choice, we highly recommend using our [mods directory](https://greenhellmodding.com/mods). Scroll through the page and click on the mod you would like to check out. Alternatively, you can find a list of the most popular mods on our [home page](https://greenhellmodding.com).

![The mods directory](https://1233583207-files.gitbook.io/~/files/v0/b/gitbook-legacy-files/o/assets%2F-M5KKfkIqMO_EFPortVm%2F-M5b2SKjM75M3kt-TU_6%2F-M5bAhEjLphtUzVxBXBP%2Fimage.png?alt=media\&token=75b70a15-e088-46f6-9aa4-681ded8e1807)

### 3. Downloading mods

On a mod's page you can find all information about a mod. You'll now need to download the mod by clicking `Download this mod` as shown below.

![Download the mod of your choice](https://1233583207-files.gitbook.io/~/files/v0/b/gitbook-legacy-files/o/assets%2F-M5KKfkIqMO_EFPortVm%2F-M5b2SKjM75M3kt-TU_6%2F-M5bB6VTkDEAODWMGXYy%2Fimage.png?alt=media\&token=993f6346-fa14-4c43-a636-19e4f5156659)

### 4. Locating your mods folder

Open the GreenHellModLoader Launcher and click on the `Mods Folder` button as shown below. Your system should now open a window showing the mods folder.

![](https://1233583207-files.gitbook.io/~/files/v0/b/gitbook-legacy-files/o/assets%2F-M5KKfkIqMO_EFPortVm%2F-M5b2SKjM75M3kt-TU_6%2F-M5bBVLAXIK5C7WM3QSP%2Fimage.png?alt=media\&token=dc69e8bd-27c8-450c-8769-2f80baed780a)

### 5. Installing the mod

After clicking on the Mods Folder button it will open your mods folder, drag and drop the downloaded .ghmod mod file in it as shown below.

![Drag and drop the downloaded file into the mods folder.](https://1233583207-files.gitbook.io/~/files/v0/b/gitbook-legacy-files/o/assets%2F-M5KKfkIqMO_EFPortVm%2F-M5b2SKjM75M3kt-TU_6%2F-M5bCF0zDlo955WbpHq_%2Fimage.png?alt=media\&token=c4784956-fccf-472c-a7fc-1a689debded4)

### 6. Loading the mod

We're already done with installing the mod! Let's see how to load it in the game. Start the game by using the launcher and clicking on the **play** button. When the game has loaded go to the **Mod Manager** tab and if the mod has **load** button click on it as shown below. You will have to click `Load Mod` every time you start Raft.

If the mod you downloaded doesn't have a **load** button but has a **blue button** as shown below its a **Permanent Mod**, That means that its loaded by default and you don't have to deal with it.

![Click on Load Mod to load a mod.](https://1233583207-files.gitbook.io/~/files/v0/b/gitbook-legacy-files/o/assets%2F-M5KKfkIqMO_EFPortVm%2F-M5b2SKjM75M3kt-TU_6%2F-M5bRPeSbgY-ekot3Agv%2Fimage.png?alt=media\&token=6f5d448d-fd44-48f4-a146-14a15cb4b807)

![Permanent mods are loaded automatically](https://1233583207-files.gitbook.io/~/files/v0/b/gitbook-legacy-files/o/assets%2F-M5KKfkIqMO_EFPortVm%2F-M5b2SKjM75M3kt-TU_6%2F-M5bSQiCElaBkIH1mj0h%2Fimage.png?alt=media\&token=0cc6d720-f125-4ec4-afac-7ba6317946c5)

### 7. Done?

If everything has worked out, the mod status should be green and the text should say **RUNNING...** as shown below.

![](https://1233583207-files.gitbook.io/~/files/v0/b/gitbook-legacy-files/o/assets%2F-M5KKfkIqMO_EFPortVm%2F-M5b2SKjM75M3kt-TU_6%2F-M5bShChPw7tJGfRzZ9i%2Fimage.png?alt=media\&token=e0d3beed-554b-42c6-942a-6775d6424301)

### **Troubleshooting**

Oh no, is anything not working as expected? Make sure to join our [Discord server](https://www.greenhellmodding.com/discord) and we will be happy to help you.<br>


# Mods in multiplayer

Everything you need to know before playing modded Green Hell with your friends.

You've already found out how to [install mods](https://docs.greenhellmodding.com/tutorials/how-to-install-a-mod) and have maybe had fun playing with mods alone. But of course, playing games is better together and you might ask yourself how to play modded Green Hell together with your friends.

### First things first: General rule

In a modded game, make sure that **all players inside a multiplayer game have the mod loader and the same mods installed**.

Some mods might work for individual players but others might break the world or crash the game if they are not installed for all players!

### Which mods work in multiplayer?

To our knowledge, basically all mods should usually work in multiplayer. To be sure, you can review the mod's page in our [mods directory](https://www.greenhellmodding.com/mods).

### Further questions

If you have further questions, you can ask us anything on our [Discord server](https://www.greenhellmodding.com/discord).


# How to create a mod project

This Tutorial aims to show you how to create a mod project on Green Hell using GreenHellModLoader!

Let's get started with the requirements!\
\
To get started modding you will need the following softwares :

* [**Visual Studio Community**](https://visualstudio.microsoft.com/downloads/). We highly recommend you to download the 2019 version.
* [**Unity 2019.3.9f1**](https://unity3d.com/unity/whats-new/2018.3.5). If you have [UnityHub](https://public-cdn.cloud.unity3d.com/hub/prod/UnityHubSetup.exe) installed simply click [here](http://fastdl.greenhellmodding.com/downloadGreenHellUnityVersion.php).
* [**dnSpy**](https://github.com/0xd4d/dnSpy/releases/latest). This is the latest available version.

{% hint style="danger" %}
**You have to use Unity 2019.3.9f1! Using another version is not supported!**
{% endhint %}

Now that you have the required softwares, let's create your mod project!

**1)** Open the GHMLLLauncher and create a mod project by using the mod creator as shown below.

![](https://1233583207-files.gitbook.io/~/files/v0/b/gitbook-legacy-files/o/assets%2F-M5KKfkIqMO_EFPortVm%2F-M5e-CESW7wlLZyMxs8f%2F-M5e2-O4rZ3ZdYf_9yc8%2Fimage.png?alt=media\&token=8635fa87-a3c0-467a-8e40-6ac6dd1276be)

**2)** In the project name text field enter your mod name and hit **Create Project!** It will then tells you if it has succeeded and opens you the project folder as shown below.

![](https://1233583207-files.gitbook.io/~/files/v0/b/gitbook-legacy-files/o/assets%2F-M5KKfkIqMO_EFPortVm%2F-M5e-CESW7wlLZyMxs8f%2F-M5e2RVBj8R_WOmdrh_u%2Fimage.png?alt=media\&token=54cd09eb-8591-4b09-9a04-8b45f7247cea)

**3)** Now that your mod project is created you can open the **.sln** file, in the case above i open **ExampleMod.sln** with Visual Studio.\
After opening it, open the **.cs** file as shown below.

![](https://1233583207-files.gitbook.io/~/files/v0/b/gitbook-legacy-files/o/assets%2F-M5KKfkIqMO_EFPortVm%2F-M5e-CESW7wlLZyMxs8f%2F-M5e2mu7khdXcS2wLAIL%2Fimage.png?alt=media\&token=93b72672-c476-4e84-8d79-9efd262595e9)

**4)** Now that we created our mod project and opened it we can begin creating our mod!\
As you can see on the screenshot above, there is a lot of green lines, those are comments, read them to know what every line do. Now, let's create a shortcut of our project folder in our mods folder so we won't have to move files or build the mod each time we modify something in our mod. Yeah this is a great feature! 😁

{% hint style="info" %}
The folder is by default located in ***Documents\GreenHellModding\YourProjectName\YourProjectName***
{% endhint %}

![](https://1233583207-files.gitbook.io/~/files/v0/b/gitbook-legacy-files/o/assets%2F-M5KKfkIqMO_EFPortVm%2F-M5e-CESW7wlLZyMxs8f%2F-M5e3l6G9_Nc7k-_1Rqv%2Fimage.png?alt=media\&token=0531954b-de7e-4771-a920-a162f5a12abe)

{% hint style="warning" %}
Create a shortcut of this folder. \
**Its the folder that contains the`modinfo.json`file and the`.cs`file(s).**\
*The main folder should also work, but we highly recommend you to create a shortcut of the second one.*
{% endhint %}

**6)** Now, let's start the mod loader, Load our mod and open the console using F10 to see what's happening.&#x20;

![](https://1233583207-files.gitbook.io/~/files/v0/b/gitbook-legacy-files/o/assets%2F-M5KKfkIqMO_EFPortVm%2F-M5e-CESW7wlLZyMxs8f%2F-M5e4ic0FWbrcr8e6kS-%2Fimage.png?alt=media\&token=4a8e0049-ae02-479d-b284-9fdd36805d8e)

Just after loading the mod. The status change to green and says "Running...". Your mod is now running!

![](https://1233583207-files.gitbook.io/~/files/v0/b/gitbook-legacy-files/o/assets%2F-M5KKfkIqMO_EFPortVm%2F-M5e-CESW7wlLZyMxs8f%2F-M5e4uhQwfMwf9zngjJW%2Fimage.png?alt=media\&token=7d0af24a-a5df-4f09-a2f2-a89ed74b2eb1)

As you can see when you press F10 it executes the code in the Start() method.

**7)** Now that you know how to write code, to modify your mod information such as its description, its license, the icon, the banner etc simply go in to your mod project files and edit the **modinfo.json** file as shown below.

![](https://1233583207-files.gitbook.io/~/files/v0/b/gitbook-legacy-files/o/assets%2F-M5KKfkIqMO_EFPortVm%2F-M5e-CESW7wlLZyMxs8f%2F-M5e5IQkBcg1JiaSmxmR%2Fimage.png?alt=media\&token=a337c699-2bd0-4c3f-a8bf-5d18e3703b46)

If you want to know more about this file, how to add an icon, what is the excludedFiles field etc, click below.

{% content-ref url="/pages/-M5e60xpeq7Cc7L9g6sM" %}
[The modinfo.json file](/modding-tutorials/how-to-create-a-mod-project/the-modinfo.json-file)
{% endcontent-ref %}

**8)** Now that you know how to write your mod and how to change its information to build it, simply generate the visual studio project and our build script will automatically pack/build your mod as shown below. The build script will generate a new file named `YourModName.ghmod` This file is the mod file to upload on our [site](https://www.greenhellmodding.com) and to put in the mods folder.

![](https://1233583207-files.gitbook.io/~/files/v0/b/gitbook-legacy-files/o/assets%2F-M5KKfkIqMO_EFPortVm%2F-M5e-CESW7wlLZyMxs8f%2F-M5e6m5_EBTLTcwwSx18%2Fimage.png?alt=media\&token=e878a91e-fa6a-433a-86e7-d5c179459570)

**And here is it! You made your first mod project!**\
**Keep in mind this tutorial is just the requirements & basics!**\
**More advanced tutorials are coming soon!**


# The modinfo.json file

This page aims to give you all the needed information about the modinfo.json file.

Here is a list of all the fields of the modinfo.json file and a small description/usage of them.\
More info about them below this table.

| Field Name         | Description                                                                                                                                                                                                                                                                                   |
| ------------------ | --------------------------------------------------------------------------------------------------------------------------------------------------------------------------------------------------------------------------------------------------------------------------------------------- |
| **name**           | <p>Type : <strong>String</strong></p><p>Description : <strong>The display name of your mod.</strong></p>                                                                                                                                                                                      |
| **author**         | <p>Type : <strong>String</strong></p><p>Description : <strong>Your username.</strong></p>                                                                                                                                                                                                     |
| **description**    | <p>Type : <strong>String</strong></p><p>Description : <strong>A small description of your mod.</strong></p>                                                                                                                                                                                   |
| **version**        | <p>Type : <strong>String</strong></p><p>Description : <strong>The current version of your mod.</strong></p><p>Usage : <strong>We recommend using</strong> <a href="https://semver.org/"><strong>Semantic Versioning 2.0.0</strong></a></p>                                                    |
| **license**        | <p>Type : <strong>String</strong></p><p>Description : <strong>The license of your mod.</strong></p><p>Usage : <strong>You can find many licenses on</strong> <a href="https://choosealicense.com/"><strong>choosealicense.com</strong></a></p>                                                |
| **icon**           | <p>Type : <strong>String / Path</strong></p><p>Description : <strong>An icon for your mod. (Can be seen in the mod manager list)</strong></p><p>Usage : <strong>We recommend you a 512x512 png or jpg image.</strong></p>                                                                     |
| **banner**         | <p>Type : <strong>String / Path</strong></p><p>Description : <strong>A banner for your mod. (Can be seen in the mod manager list)</strong></p><p>Usage : <strong>We recommend you a 660 x 200 png or jpg image.</strong></p>                                                                  |
| **gameVersion**    | <p>Type : <strong>String</strong></p><p>Description : <strong>The version of Green Hell that you made was made for.</strong></p><p>Usage : <strong>This is just for info, Mods should remain compatible across versions</strong>.</p>                                                         |
| **updateUrl**      | <p>Type : <strong>String / Url</strong></p><p>Description : <strong>A link that returns the latest available version of your mod.</strong></p><p>Usage : <strong>Our site provides you an url when you release your mod.</strong></p>                                                         |
| **isModPermanent** | <p>Type : <strong>Boolean (true or false)</strong></p><p>Description : <strong>Defines if your mod is permanent. Permanent mods are loaded by default and can't be unloaded. This is needed when mods add new items/blocks that can't really be unloaded without causing issues.</strong></p> |
| **excludedFiles**  | <p>Type : <strong>Array of strings / List of strings</strong></p><p>Description : <strong>Allows you to specify files to not load. This doesn't support wildcards yet.</strong></p><p>Usage : <strong>Useful when you want to exclude files like readme or source files.</strong></p>         |

\
**Icon & Banner Fields :** \
**Just add an image to your solution folder where your `.cs` files and the `.csproj` file is and edit the `modinfo.json` file as shown below.**

![](https://1233583207-files.gitbook.io/~/files/v0/b/gitbook-legacy-files/o/assets%2F-M5KKfkIqMO_EFPortVm%2F-M5eDSsjwiUWaLaLvoJ2%2F-M5eLQxSe2MfTv4wdoCA%2Fimage.png?alt=media\&token=1dde7eaa-2c04-457f-8dba-f6bb9104b52d)

**UpdateUrl Field :**\
**GreenHellModLoader fetch this link to know what is the latest available version of your mod, if the currently installed version is not equal to the version returned by this url it will say that the mod is outdated.**\
**Our website offer this service with a nice automation system. Available on the following link once you have a mod slug.**\
`https://greenhellmodding.com/api/v1/mods/`**`YOURMODSLUG`**`/version.txt`

**ExcludedFiles Field :**\
**This is a simple list of excluded files as shown below.**

<div align="left"><img src="https://1233583207-files.gitbook.io/~/files/v0/b/gitbook-legacy-files/o/assets%2F-M5KKfkIqMO_EFPortVm%2F-M5eDSsjwiUWaLaLvoJ2%2F-M5eMfiNdAlpQcRRqPZ9%2Fimage.png?alt=media&amp;token=a8ed217b-34d5-4e8d-aa92-b0ca01f6f0f2" alt=""></div>


# How to create an AssetBundle

This tutorial aims to show you how to import assets into the game such as 3d models, textures, prefabs, particles etc...

Let's get started with the requirements! \
For this tutorial you will need the same requirements as the first tutorial.

**1)** First, create a new Unity project with the same version as the one required in [**How to create a mod project**](https://docs.greenhellmodding.com/modding-tutorials/how-to-create-a-mod-project).

**2)** Then once the first step is done, download [this file](https://www.raftmodding.com/TeKGameRMods/AssetBundleBuilderByTeK.zip) and place it into your Unity Project as shown below. This will allow you to build your asset bundle file. &#x20;

<div align="left"><img src="https://1233583207-files.gitbook.io/~/files/v0/b/gitbook-legacy-files/o/assets%2F-M5KKfkIqMO_EFPortVm%2F-M5jGTldSf4KpH8soL9S%2F-M5jGn6AxKD9spuzVtQW%2Fimage.png?alt=media&amp;token=468f315d-6ef8-4050-a99b-26c0164680cb" alt=""></div>

**3)** Add your stuff to the asset bundle as shown below. &#x20;

![](https://1233583207-files.gitbook.io/~/files/v0/b/gitbook-legacy-files/o/assets%2F-M5KKfkIqMO_EFPortVm%2F-M5jGTldSf4KpH8soL9S%2F-M5jGqfSMvjFkLxtHrD6%2Fimage.png?alt=media\&token=8b380f9b-929a-4bd5-8e27-5b0a81bd7971)

**4)** Once you have everything in your assetbundle, build it by right clicking anywhere and clicking on **Build AssetBundles** as shown below. &#x20;

<div align="left"><img src="https://1233583207-files.gitbook.io/~/files/v0/b/gitbook-legacy-files/o/assets%2F-M5KKfkIqMO_EFPortVm%2F-M5jGTldSf4KpH8soL9S%2F-M5jGtRxnif7PyECN-xZ%2Fimage.png?alt=media&amp;token=313b1402-e89e-4525-ac68-48c7a85fc854" alt=""></div>

**5)** If your assetbundle has succeeded building you should be able to find it in **Assets/AssetBundles**; Once you found it, copy it into your mod project folder where your .cs files and your modinfo.json file are located as shown below. &#x20;

<div align="left"><img src="https://1233583207-files.gitbook.io/~/files/v0/b/gitbook-legacy-files/o/assets%2F-M5KKfkIqMO_EFPortVm%2F-M5jGTldSf4KpH8soL9S%2F-M5jHBoAkHlMElnkvpEb%2Fimage.png?alt=media&amp;token=2c381e99-7d31-4ac5-8c17-e183c87fce0a" alt=""></div>

**6)** Now let's load it into the game using our previous mod made in the [**How to create a mod project**](https://docs.greenhellmodding.com/modding-tutorials/how-to-create-a-mod-project) tutorial. Open your mod project and change your start method type from **`void`** to **`IEnumerator`** and copy the code below into the start method as shown below; You will also need to create a new variable in your mod to be able to access the asset bundle from anywhere in your mod.

{% tabs %}
{% tab title="Help Image" %}
![](https://1233583207-files.gitbook.io/~/files/v0/b/gitbook-legacy-files/o/assets%2F-M5KKfkIqMO_EFPortVm%2F-M5jGTldSf4KpH8soL9S%2F-M5jHm-2JfRQ2XrbPOyW%2Fimage.png?alt=media\&token=5e437d19-8268-47c6-9c75-fc0a9e1fde7e)

{% hint style="info" %}
I&#x66;**`IEnumerator`** is underlined in red, simply add **`using System.Collections;`**&#x61;t the top of your mod file.
{% endhint %}
{% endtab %}

{% tab title="Code" %}

```csharp
AssetBundle asset;

public IEnumerator Start()
{
    AssetBundleCreateRequest request = AssetBundle.LoadFromMemoryAsync(GetEmbeddedFileBytes("tutorial.assets"));
    yield return request;
    asset = request.assetBundle;

}
```

{% endtab %}
{% endtabs %}

**7)** Loading an asset bundle is good, but we also need to unload it when we unload our mod. So, to do that in your ***`OnModUnload`*** method simply add **`asset.Unload(true);`** as shown below. &#x20;

<div align="left"><img src="https://1233583207-files.gitbook.io/~/files/v0/b/gitbook-legacy-files/o/assets%2F-M5KKfkIqMO_EFPortVm%2F-M5jGTldSf4KpH8soL9S%2F-M5jI38w3Ky0YxQQdwSW%2Fimage.png?alt=media&amp;token=534cfa39-4efc-4558-843b-bdb6cc9b273b" alt=""></div>

**8)** Now, to load something from our asset bundle simply use **`asset.LoadAsset<T>("assetname")`** for example to load the ***RedCube*** that i added into the example asset bundle earlier i can just do **`asset.LoadAsset<GameObject>("RedCube")`**.

And here is it! As this can be a bit complicated if you encounter any issue or if you are blocked at a specific step, feel free to join our [Modding Discord](https://www.greenhellmodding.com/discord) and ask for help in #support.


# Reading private variables

Reading private variables is clearly necessary when modding raft. Let's see how easy it is!

To access private variables we need to use **Harmony**. You can visit the Harmony wiki by clicking [here](https://github.com/pardeike/Harmony/wiki).\
*`Harmony is a library for patching, replacing and decorating .NET and Mono methods during runtime.`*\
\
To use harmony you simply need to add the `Harmony` namespace by adding `using Harmony;` at the top of your class.

\
To access a **non-static private variable** you use Traverse.Create() with the object instance and .Field() with the field name.

```csharp
string myvalue = Traverse.Create(ScriptInstance).Field("fieldname").GetValue() as string;

// For example to get the value "m_MinFallingHeight" of the class Player we can do that :
float val = Traverse.Create(Player.Get()).Field("m_MinFallingHeight").GetValue() as float;
```

\
To access a **static private variable** you also use Traverse.Create() but with the class type and .Field() with the field name.

```csharp
string myvalue = Traverse.Create(typeof(classname)).Field("fieldname").GetValue() as string;

// For example to get the value "s_Initialized" of the class ItemIDHelpers we can do that :
bool myvalue = Traverse.Create(typeof(ItemIDHelpers)).Field("s_Initialized").GetValue() as bool;
```


# Modifying private variables

Modifying private variables is clearly necessary when modding raft. Let's see how easy it is!

To modify private variables we need to use **Harmony**. You can visit the Harmony wiki by clicking [here](https://github.com/pardeike/Harmony/wiki).\
*`Harmony is a library for patching, replacing and decorating .NET and Mono methods during runtime.`*\
\
To use harmony you simply need to add the `Harmony` namespace by adding `using Harmony;` at the top of your class.

\
To modify a **non-static private variable** you use Traverse.Create() with the object instance, .Field() with the field name and .SetValue()

```csharp
Traverse.Create(ScriptInstance).Field("fieldname").SetValue(newvalue);

// For example to set the value "m_MinFallingHeight" of the class Player we can do that :
Traverse.Create(Player.Get()).Field("m_MinFallingHeight").SetValue(10);
```

\
To modify a **static private variable** you also use Traverse.Create() but with the class type, .Field() with the field name and also .SetValue();

```csharp
Traverse.Create(typeof(classname)).Field("fieldname").SetValue(newvalue);

// For example to set the value "s_Initialized" of the class ItemIDHelpers we can do that :
Traverse.Create(typeof(ItemIDHelpers)).Field("s_Initialized").SetValue(false);
```


# Accessing the player instance

In order to access the local player instance, we use the `.Get()` method from the Player class which returns the instance of the local player.

```csharp
Player player = Player.Get();
```


# Giving items to a player

To give an item to a player you can use the `AddItemToInventory` method on the `Player` class.

```csharp
Player.Get().AddItemToInventory("Meat_Cooked");
Player.Get().AddItemToInventory("Candy_bar_1");
Player.Get().AddItemToInventory("Mouse_Meat_Cooked");
Player.Get().AddItemToInventory("Bamboo_Spear"); 
```

{% hint style="info" %}
You can find all in-game items in the ItemID enum. \
In 1.5.2 there is more than 700 items!
{% endhint %}


# Modifying the inventory max weight

In order to modify the inventory max weight we can simply change a single value in the `InventoryBackpack` class as shown below.

```csharp
InventoryBackpack.Get().m_MaxWeight = 999;
```


# Unlocking everything in the Notepad

In order to unlock everything in the notepad, we use the `.UnlockAllItemsInNotepad()` method from the `ItemsManager` class as shown below.

```csharp
ItemsManager.Get().UnlockAllItemsInNotepad();   
```


# Disabling player movement

In order to block/disable the player movement we can use 2 methods from the `Player` class.

```csharp
// Blocking the movement and rotation
Player.Get().BlockMoves();
Player.Get().BlockRotation();

// Unblocking the movement and rotation
Player.Get().UnblockMoves();
Player.Get().UnblockRotation();
```


# Toggling the mouse/cursor

In order to toggle the mouse/cursor we use the `CursorManager` , You have to only call the `.ShowCursor()` method once! As its "Requesting" the cursor.

If you request it too many times you will have to hide it the same amount of time! So only call this when opening your menu and when closing it, don't call it each frame while your menu is open.

```csharp
// Show the cursor :
CursorManager.Get().SetCursor(CursorManager.TYPE.Normal);
CursorManager.Get().ShowCursor(true, true);

// Hide the cursor :
CursorManager.Get().ShowCursor(false,false);
```

{% hint style="warning" %}
Known issue : We don't know yet how to properly disable all actions such as opening the inventory, opening the character wheel etc. So it can be a little bit messy when using input fields inside menus.\
**If you want to contribute to the modding research, join us on our** [**discord**](https://www.greenhellmodding.com/discord)**.**
{% endhint %}


# Printing to the console

To print to the console we use the unity `Debug` class as shown below.

```csharp
Debug.Log("This is a simple log.");
Debug.LogAssert("This is an assert...");
Debug.LogError("This is an error...");
Debug.LogException("This is an exception...");
Debug.LogWarning("This is a warning...");
Debug.Log(new Vector3(0,0,0));
Debug.Log(myvalue);
```

{% hint style="warning" %}
When using the System namespace its Debug class might do some weird stuff.\
\
**You can use**\
**`UnityEngine.Debug.Log()`** \
**or simply add**\
**`using Debug = UnityEngine.Debug;`** \
**at the top of your class after the imports.**
{% endhint %}


# Slugs

Slugs are strings that can be used in URLs. Slugs must fulfill all of the following rules:

* Slugs must be at least one character and at most 64 characters long.
* Slugs may only contain letters, numbers, dots ("."), dashes ("-") and underscores ("\_").
* All letters must be in lower case and from the basic latin alphabet.

### Examples

{% hint style="success" %}
Good examples:

* *`my-mod`*
* *`version-1.3.4`*
* *`test-6.4.1_RC-3`*
  {% endhint %}

{% hint style="danger" %}
Bad examples:

* *`be$t-mod`*(dollar signs are not allowed)
* *`café-mod`*("é" is not a letter of the latin alphabet)
* *`<script>alert('xss')</script>`* ("<>()'/" are not allowed)
* *`my mod 2`* (whitespaces are not allowed)
* *`a-very-very-very-very-very-very-very-very-very-very-very-very-very-long-name`* (longer than 64 characters)
  {% endhint %}